Monday, January 24, 2011

Manual digital camera noise removal & skin smoothing.

A lot of people comes to a solution of fixing dusty and noisy images by just simply using a one step noise reduction rendered by intelligent-less image editing software.

Well there's nothing really bad about that because it's really an easy and quick way to automatically smooth up rough texture. But if you look at the picture properly, it's loosing quite a lot of important detail on the image. Normal noise reduction software does this by actually blurring the image using extra-fine 'Gaussian' blur filter and there's usually a setting where you can adjust how fine you want the blurring to be. For instance, the more you adjust it to blur, the more noise-less the image would be. Now the good thing about doing this is that you'll get an image resulting almost 100% noise free, but you're loosing the sharpness of the image and also you're blurring the focus of the image resulting a 'soft-focused' image.

*This error happened a lot to teenagers who love editing their photos to remove digital camera noises and also to get rid of pimples or spots on the face before uploading them to Facebook. Hahaha... XD

Adobe Photoshop has really created what human should be happy and proud of, the .ATN (Action file). This intelligent software has the ability to record a series of editing process and save it later on as a .ATN file. It can later on be uploaded to the internet for sharing and also it's file size is really small that none of them I find is more than 100kb. Well still, that doesn't mean downloading the .ATN file does all the refining job for you. Some of the .ATN file require basic Adobe Photoshop knowledge to be able to use them. Here are some examples of what I did with the action files I've downloaded to manually refine the image.

Image belongs to their rightful owner.


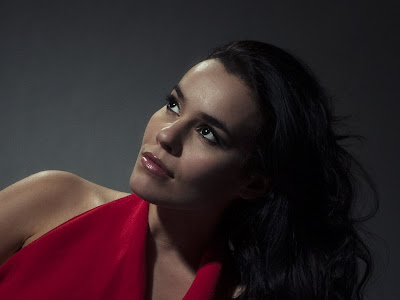
Here is the original image.
Did you notice that the skin on the face is a little rough and uneven?

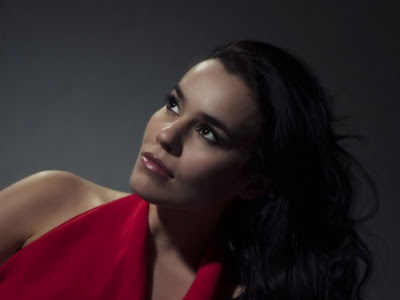
Here is the image that has been processed with one step noise removal.
Did you see how badly the process blurred and unsharpened the image?

Here is the image that I've manually edited to remove ONLY unwanted noises and texture.
Did you notice that the skin is much smoother than the original one but the face and overall outline still maintain it's sharpness and focus?

Sunday, August 8, 2010

Garden shots!

If you don't have a model at home and out of idea of what to shoot or just bored of shooting indoor with messy backgrounds, why not go outdoor? Here's something you should really try out, shooting in the garden!
Get your camera with macro lens attached and a camera stand and head into your garden. Try shooting flowers and bugs at different angles and different aperture setting. For me, I always like to do 'Overhead' shot and 'Side-angle' shot. Here's some photos I've taken earlier today in the afternoon. Enjoy. =)


Tuesday, July 27, 2010

Photoshop 'Liquify' effects.

Hi guys, I'm here to show you a little bit of my latest work, 'The Liquifying Effects". First of all, I'm sorry for being such a software person. Well, since I don't have a good system camera yet, so editing is what I can do to get good images at the moment. Haha...

So here it is, the original image that I've taken on my camera which I actually had turn it into a Lomography which I've showed you in the previous post.


And here's the final image that I've edited in Photoshop using the 'Liquify' tool which you can find under the 'Filter' tab in your Photoshop.
Usually you'll only get effect like this in the form of RAW if you have a good lens with a Polarized filter and when you're taking a picture somewhere near the lake or places with wet floor. So if you don't have a good system camera with polarized filter, just put on your Polarized filter in Photoshop. And if you're a Photoshop freak, you'll know what I mean.

Monday, July 19, 2010

Photoshop 'LOMO' Effect.

If you're looking for an effect to add character and impact to your images, you should definitely consider trying out Lomography. Lomo was a Russian camera brand, founded in 1914 and famed for its unique effect that gives images taken with Lomo cameras a high contrast, slightly cross-processed look, often accompanied by a dark vignette. Lomo cameras can still be bought today, but the good news for DSLR users is that the Lomo effect can be easily applied to your images via a few simple steps in Photoshop. The effect is perfect for landscapes, urban cityscapes and even portraits. In fact, there aren't many image situation that Lomo can't be applied too.

Here's some examples that I've edited via Photoshop.

This is an original compressed RAW image that I've taken on my DSLR.
This is the final image after editing it in Photoshop with priority on the Levels.
This is an original compressed RAW image taken with a Fish-eye Lens & Polarized slot-in filter.
This is the final image after editing it in Photoshop with priority on the Curves.

Monday, July 12, 2010

It's SUGAR SUGAR SUGAR madness!!! XD

He's falling asleep very soon. Haha...
He's looking at the camera lens. LOL
Rolling up into a ball. XD
This is the way he smile. =)
Baby Glider: " O.O? "
Sleeping again?
Posing... Hahaha...
"Your thumb smells like food."
Peek-A!!!
Boo!!! XD
Ah... Really a sleepy head. Hahaha...
Look at him!!! LOL

Sunday, July 4, 2010

The 4th KK Jazz Festival's snaps!!!

If you want to see a larger image size version of the photos just click on the photos and when you're done just click "Back" to go back to the photos layout or to keep the layout page, right click on the photo and choose "Open in a new tab" and when you're done just close the tab.
Spotlights spotlights lots of spotlights. Smokes and smokes lots of smokes. It's totally burning and smoking!!!
Roger Wang with the Mood Indigo at the festival.
Friends and crews of the festival having their last few buckets.
Roger Wang behind the stage getting ready for the performance.
The official beer of the festival, it has got to be Carlsberg!
Rene Barrow and the UMS Big Band! What a blast.
The UMS Big Band led by 3 of the UMS music study lecturers.
Look at the crowd!
It's dim and it's cold with a little bit of rain but the show has to go on!
I just like how the light focused on the Jazz Festival logo before the performances start.
Side view of the stage.
It's not lighting up so I thought of remembering it. Hahaha...
A lot of dead bulbs tho... =___=||
That's Moses on the left and that's Annabelle in the middle. Hahaha!!! The guy on the right is also a musician who play the bass, but sadly I forgot his name.
Andrew Lim! One of my favourite guitarist of the night. This snap is dedicated to him... Hahaha!!!
Him again in the dark lighting.

Saturday, July 3, 2010

4th Jazz Festival 2010 snaps.

Hey peeps. My house is having a big renovation at the moment so I'll upload the 4th Jazz Festival photos later on when I finish editing them. Be patient guys! Cheers!!! XD